
yup, a tutorial. my first tutorial.

A Thanksgiving Countdown Calendar.
I wanted to have a special way to mark down each day before Thanksgiving with the kids, but more than just a paper chain, I wanted to have something that could be used to connect my kids to focusing on having a thankful heart as we approach the holiday. i decided to use a tree because Thanksgiving and Fall go hand and hand. How my calendar works is that you have a leaf stick for every day counting down for Thanksgiving. Each day you take one leaf down to mark that you are getting one day closer to Thanksgiving (in case anyone didn't understand how a countdown or advent calendar works) however, with the blank end of the popsicle stick write down something or someone you are thankful for.
You can choose to review the fallen leaves everyday, or on Thanksgiving. I am super excited for a way to teach my young ones about who and what we are thankful for.
You can reuse this calendar each year- you might want to make a couple of extra leaf sticks (for years where there are more days to countdown) and for each year you can either paint your stick, or add construction paper to cover what you wrote the year before- or keep them and talk about them each year!
For this project you need:
Various colors of felt- i used orange, red, brown, and yellow.
Fabric for your calendar (you could really use anything- even felt if you so desire)
Ribbon (to hang the calendar)
Popsicle sticks
Cardboard, Canvas, or Poster board for the back of you calendar (in the tutorial i used poster board)
Glue (i used and recommend a hot glue gun)
Scissors
your sewing machine
Step 1: Lay your Calendar Fabric over Poster board (or whatever you are using for backing) and determine the size you want your calendar to be.

Step 2: trim off any extra cardboard or poster board (obvisously you won't need to trim the canvas)

it is a very good idea at this point to iron your fabric (i really should have down that a bit more)
Step 3: now that you have the backing for your calendar let's make the leaves! this is really, really easy.
Cut out your leaves:
i did:
7 red, 7 six, 7 orange, and 5 brown (since my tree was brown)
i just cut this little petal leaf- you can use whatever leaf that you fancy.
 attach your leaves to your sticks:
 Assemble your materials.
 Apply a little glue to the end of a stick.
 Lay your leaf on the glue and press, do this for all of your leafs.


Step 4: Make and attach the tree to the fabric for your calendar.
 It helps to fold your fabric lengthwise and press, and then fold again and press- this will give you a cross in the middle of the fabric, giving you a way to center your tree.
Assemble your tree on the fabric.
 keep your baby away from your sewing project.
 pin your branches in place.
 you want to sew the branches first so that you can slip your popsicles into the branches. make sure you leave the tops of the branches open so the leaves have a place to go. here is where i made my first error- my branches needed to be a little wider so that the leaves would fit more securely. my brances were 1 1/2 inches by 5 inches- i recommend at least 2 by 5.
lay your trunk over the branches and sew it in place, not sewing the top of the trunk.
 my trunk was 2 1/2 by 7 inches.
 sew a line 2 inches down on the top of the trunk, creating a pocket for more leaves.
 Step 5: Attach your calendar to your backing- either your canvas, cardboard or poster board. Pull the edges tightly around your backing and use your glue to secure the fabric to your board.
It is really important that you pull the calendar very tightly to the back of the board to avoid any pillowing of your fabric.
Step 6: Add ribbon to the top of the calendar so you can hang it proudly.

Step 7: Arrange your leaves in a pleasing manner.
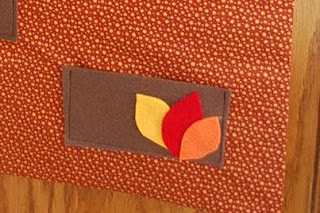
 Step 8: An optional step- I created a little pocket on my calendar so that i could have a place to put the fallen leaves. I took a small piece of felt and sewed up 3 of the sides and added a couple of my extra leaves to it.
 Step 9: Hang and enjoy!

Step 3: now that you have the backing for your calendar let's make the leaves! this is really, really easy.
Cut out your leaves:
i did:
7 red, 7 six, 7 orange, and 5 brown (since my tree was brown)
i just cut this little petal leaf- you can use whatever leaf that you fancy.
 attach your leaves to your sticks:
 Assemble your materials.
 Apply a little glue to the end of a stick.
 Lay your leaf on the glue and press, do this for all of your leafs.

Step 4: Make and attach the tree to the fabric for your calendar.
 It helps to fold your fabric lengthwise and press, and then fold again and press- this will give you a cross in the middle of the fabric, giving you a way to center your tree.
Assemble your tree on the fabric.
 keep your baby away from your sewing project.
 pin your branches in place.
 you want to sew the branches first so that you can slip your popsicles into the branches. make sure you leave the tops of the branches open so the leaves have a place to go. here is where i made my first error- my branches needed to be a little wider so that the leaves would fit more securely. my brances were 1 1/2 inches by 5 inches- i recommend at least 2 by 5.
lay your trunk over the branches and sew it in place, not sewing the top of the trunk.
 my trunk was 2 1/2 by 7 inches.
 sew a line 2 inches down on the top of the trunk, creating a pocket for more leaves.
 Step 5: Attach your calendar to your backing- either your canvas, cardboard or poster board. Pull the edges tightly around your backing and use your glue to secure the fabric to your board.
It is really important that you pull the calendar very tightly to the back of the board to avoid any pillowing of your fabric.
Step 6: Add ribbon to the top of the calendar so you can hang it proudly.

Step 7: Arrange your leaves in a pleasing manner.
 Step 8: An optional step- I created a little pocket on my calendar so that i could have a place to put the fallen leaves. I took a small piece of felt and sewed up 3 of the sides and added a couple of my extra leaves to it.
 Step 9: Hang and enjoy!


Owwww! I love this! Definatly making one great idea!
ReplyDeleteThis is brilliant, of course. Utterly brilliant.
ReplyDeleteThis is so cute! Serena emailed me about this and I'm so glad she did! I would love to link to this if you didn't mind.
ReplyDeleteCame over from One Pretty Thing. (huge grin) What a wonderful tutorial. ;)
ReplyDeleteWhat a cute idea!!
ReplyDeleteYou are so clever! I am always so impressed! And, proud to say you belong to me!
ReplyDeleteGREAT idea!! I've been looking for something like this, and it's perfect :-). Thanks!
ReplyDeleteI love this! Thanks for sharing! (Found you through OPT.)
ReplyDeleteThis is such an awesome concept for a Thanksgiving craft project! I've linked to it from my site here:
ReplyDeletehttp://www.allfreeholidaycrafts.com/Kids-Thanksgiving-Crafts/Countdown-to-Thanksgiving-Tree
Please let me know if it's okay to link to your projects in this way in the future.
Thanks!
Rachel
rbernstein@primecp.com